Showing posts with label Chocolate Cake. Show all posts
Showing posts with label Chocolate Cake. Show all posts
Thursday, February 20, 2014
Saturday, February 15, 2014
Cheesecake Filled Chocolate Easter Eggs
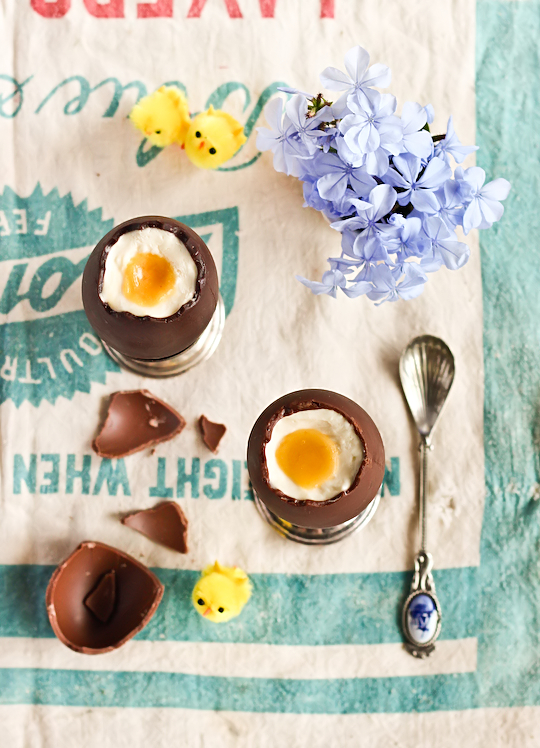
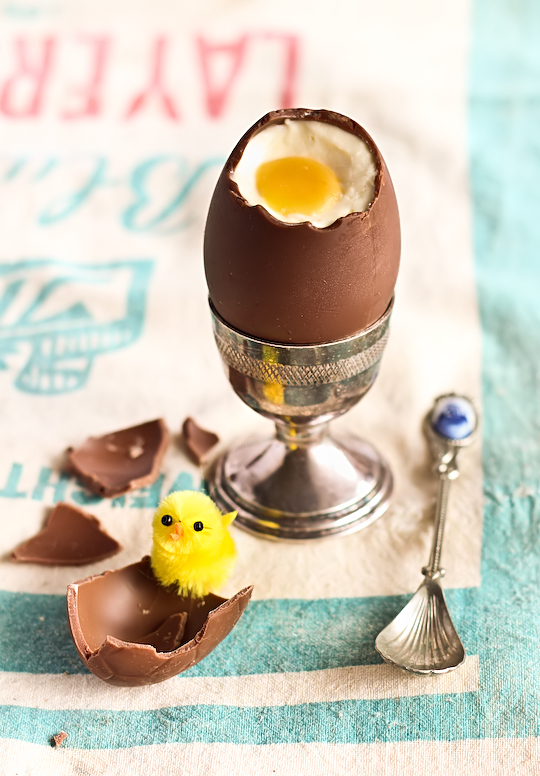
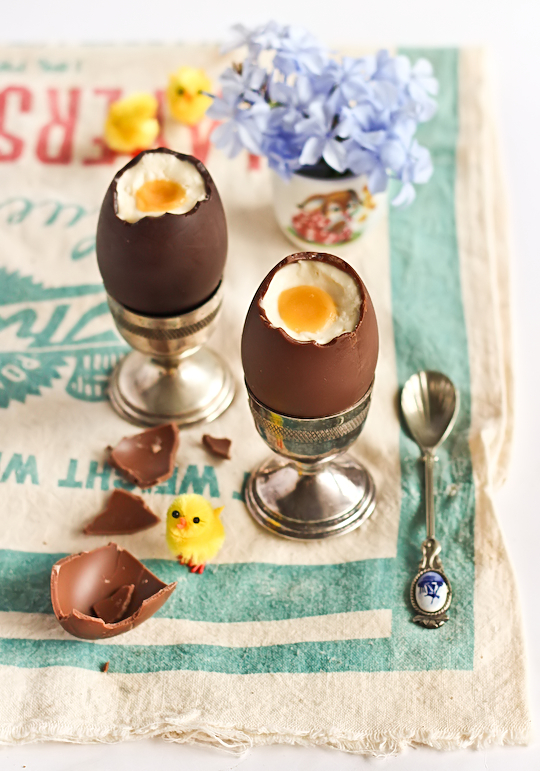
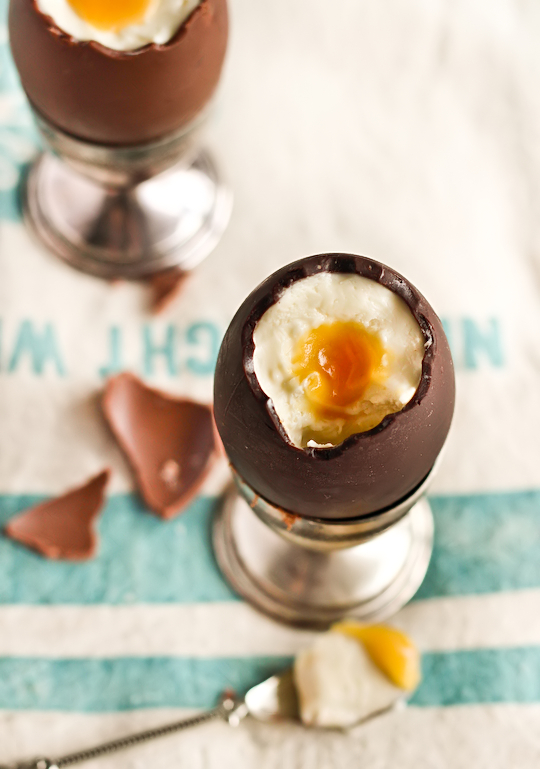
It's hard to believe Easter is just around the corner. This year is going too fast for me to keep up! I swear it felt like yesterday that I was laughing at how quickly the Easter displays went up to replace the Christmas stuff at the beginning of the year, it has managed to creep up on me. My days are getting busier and busier, so I am easily drawn to the simpler, quicker desserts that I can pull together at the last minute. This recipe could not be any easier; there's no baking involved and it takes hardly any time to create these cuteCheesecake-Filled Chocolate Easter Eggs with a 'yolk' made of passionfruit sauce.
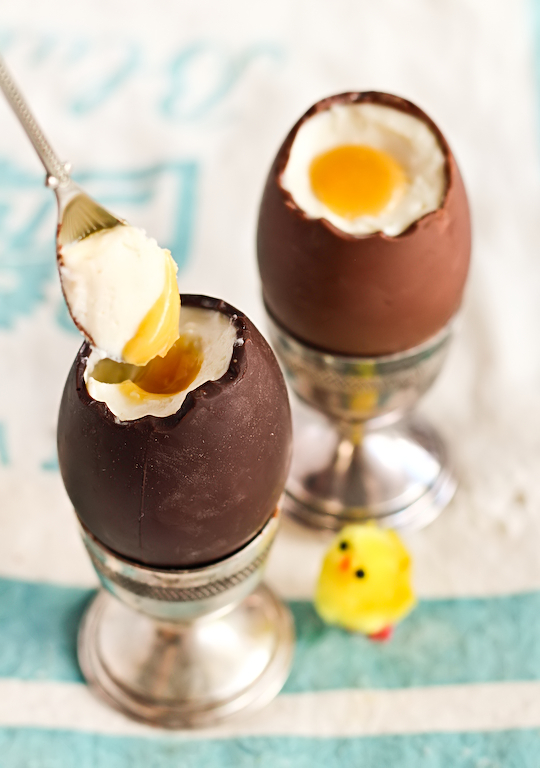
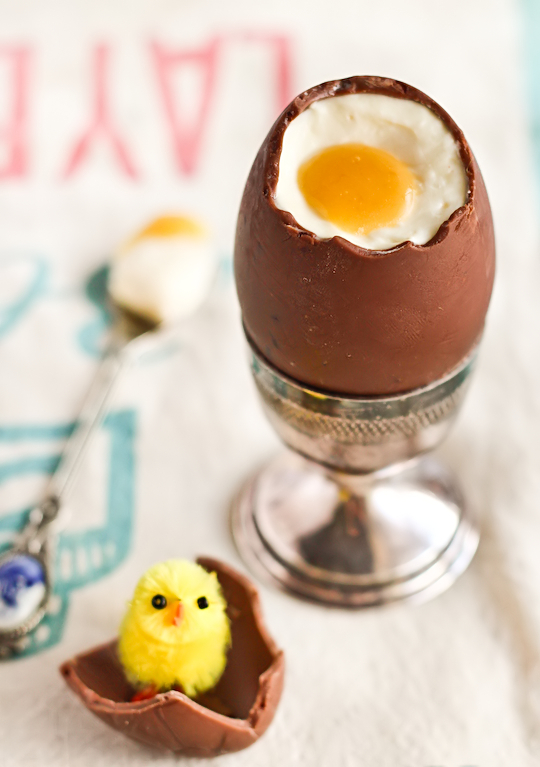
I took it as a compliment when Lisa (who hates eating eggs) said that these looked so much like real eggs that she was a little creeped out by them. The texture of the chilled cheesecake and the passionfruit sauce looks just right, making it a great filling for some regular hollow chocolate easter egg shells that I cut the tops off. I was inspired by the chocolate-mousse filled Easter egg cups that I've seen on sale and decided to do my own spin on that idea but with a cheesecake filling and a deliciously fruity filling in the centre that would look like an egg yolk. So it looks a little like a creme egg. It's not the same but it's just as tasty.
I used my regular chilled cheesecake filling recipe for this, and made up a sauce using passionfruit pulp, apricot jam and a little bit of butter. There's enough sourness from the passionfruit (and the lemon in the cheesecake) to make this a light, creamy and not overly sweet dessert. And it does not get easier than this. It's quite interesting to see how simple this recipe is compared to the Easter Bunny Macarons (including all the hilarious scenarios that I got carried away with while photographing them) and Hot Cross Bun Ice Cream Sandwiches that I came up with last year. This recipe is much quicker and less complicated, but hopefully just as enjoyable to eat!
Alright, I admit I may have taken a few too many photos of these little treats. Probably more than was necessary. But I am still a little scarred from all the trouble I had with the ugliness that way my Twix Cake so I was just happy to have something cute and not falling apart to photograph. Surprisingly A was all excited when he saw these in the fridge and quickly ate two of them, I can never guess which of my recipes he'll end up liking but he was a big fan of the fluffy cheesecake filling and the small hit of passionfruit in the centre. Technically it's more of a cheesecake mousse since there's no crust (though you could put some crust at the bottom of each egg if you wanted) and it's not baked, or a cake.
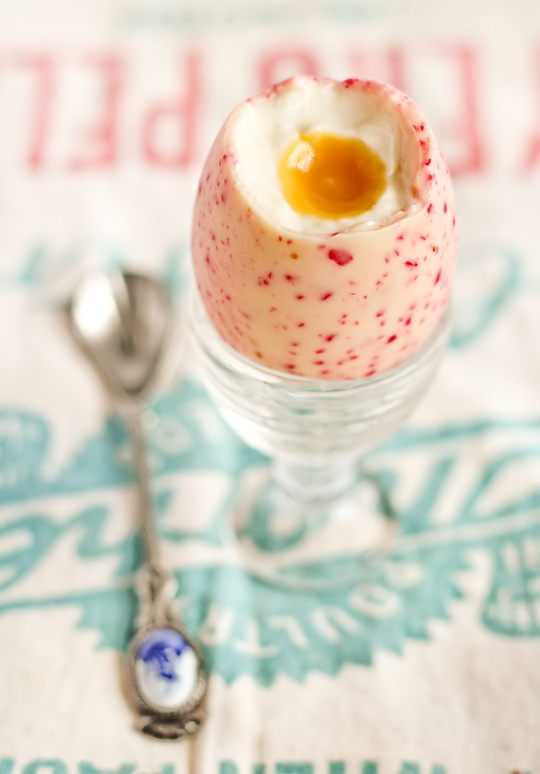
So if you're looking for a really, really, REALLY easy and light dessert to serve up after a big meal during the Easter break then these are for you. They can be eaten with a small spoon or devoured like a creme egg, whatever floats your boat. I bought the chocolate eggs from the supermarket, but if you're feeling really adventurous you could try making your own. Any plain, regular-sized hollow chocolate eggs will do. I got some very pretty ones that had all different flavours, I especially liked the look of the white chocolate and strawberry shell below. I hope everyone has a wonderful Easter holidays, I am looking forward to some time off!
Cheesecake-Filled Chocolate Easter Egg Cups
(makes 6-8 regular sized easter egg cheesecakes, you may need to adjust the amount of cheesecake filling depending on the size of your eggs)
6-8 hollow chocolate easter egg shells (mine were from the supermarket, approx 6cm tall and 4cm at its widest width,apparently they're not so easy to find in the US so if anyone can find a good online store let me know and I'll link it, apparently you can find them in the US at See's Candy and Costco, thanks Birgit! And HERE at Amazon.com, thanks Tuscadero! Or make your own here. Another commenter rolled melted chocolate around the inside of a cleaned out egg shell and then peeled away the shell when it was set.)
150g (about 5oz) cream cheese, softened
30g (about 1/4 cup) icing sugar (confectioners' sugar), sifted
1/2 tsp lemon juice
1/2 tsp pure vanilla extract
125ml (about 1/2 cup) thickened/heavy whipping cream
For the 'yolk': 1 passionfruit, 1 tbsp apricot jam, 1 tbsp (about 15g) unsalted butter (passionfruit juice can be replaced with about 2 tsp of freshly squeezed orange, mandarin juice or mango, peach nectar, you can adjust the amount of juice to taste), alternatively you can substitute with any fruit curd you prefer.
Optional: you can include some cheesecake crust crumbs at the base of each egg if you really want to include some sort of crust into the dessert.
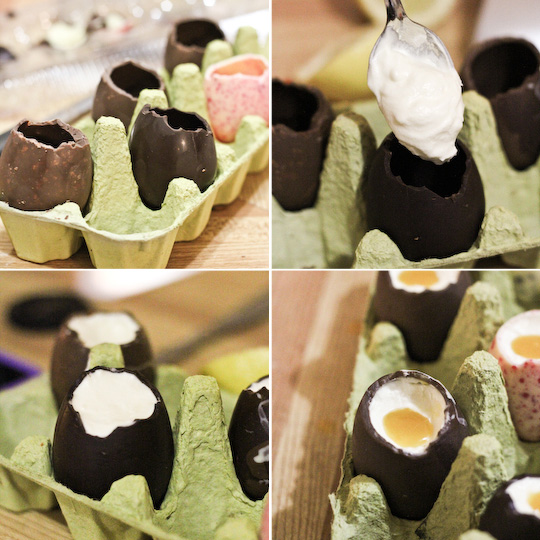
Using a small serrated knife, carefully remove the tops of the chocolate eggs. (A couple of people have mentioned that heating the knife under warm water will make this easier and neater, thanks for the tip! But personally I like having the jagged edges.) Place the eggs in the fridge to keep them chilled while you prepare the cheesecake filling, you can use egg cups or your fridge egg holder (Don't use an egg carton like me. I shouldn't have used it but I was desperate at the time, I bought the egg cups the day after!). Place the cream cheese, icing sugar, lemon juice and vanilla in a large mixing bowl and beat on high until the mixture is smooth and fluffy, about 3-4 minutes. Set aside and carefully whip the thickened cream in a separate mixing bowl to stiff peaks (watch it closely as thickened cream is very easy to overwhip and split). Using a whisk, gently combine the whipped cream into the cream cheese mixture until it is smooth. Carefully spoon or pipe the mixture into the prepared chocolate shells. Chill eggs for at least 30 minutes to allow it to set.
Prepare the passionfruit sauce; strain passionfruit pulp to remove the seeds and place in a small saucepan with the apricot jam and butter. Gently heat on low, whisking until the butter melts and the mixture is smooth. Remove from the heat and allow to cool. (If your apricot jam is chunky you should strain the sauce at this point) Place in the fridge and chill until it thickens slightly. Using a small spoon, carefully scoop out a hole in the centre of each cheesecake, about 1 cm deep and wide. Fill hole with some of the chilled passionfruit sauce and return the eggs to the fridge to chill again for at least 30 mins. Remove eggs from the fridge about 10 minutes before serving. Can be made 2-3 days in advance, keep eggs in the fridge in a holder inside an airtight container or covered tightly with clingfilm to stop them drying out.
I took it as a compliment when Lisa (who hates eating eggs) said that these looked so much like real eggs that she was a little creeped out by them. The texture of the chilled cheesecake and the passionfruit sauce looks just right, making it a great filling for some regular hollow chocolate easter egg shells that I cut the tops off. I was inspired by the chocolate-mousse filled Easter egg cups that I've seen on sale and decided to do my own spin on that idea but with a cheesecake filling and a deliciously fruity filling in the centre that would look like an egg yolk. So it looks a little like a creme egg. It's not the same but it's just as tasty.
I used my regular chilled cheesecake filling recipe for this, and made up a sauce using passionfruit pulp, apricot jam and a little bit of butter. There's enough sourness from the passionfruit (and the lemon in the cheesecake) to make this a light, creamy and not overly sweet dessert. And it does not get easier than this. It's quite interesting to see how simple this recipe is compared to the Easter Bunny Macarons (including all the hilarious scenarios that I got carried away with while photographing them) and Hot Cross Bun Ice Cream Sandwiches that I came up with last year. This recipe is much quicker and less complicated, but hopefully just as enjoyable to eat!
Alright, I admit I may have taken a few too many photos of these little treats. Probably more than was necessary. But I am still a little scarred from all the trouble I had with the ugliness that way my Twix Cake so I was just happy to have something cute and not falling apart to photograph. Surprisingly A was all excited when he saw these in the fridge and quickly ate two of them, I can never guess which of my recipes he'll end up liking but he was a big fan of the fluffy cheesecake filling and the small hit of passionfruit in the centre. Technically it's more of a cheesecake mousse since there's no crust (though you could put some crust at the bottom of each egg if you wanted) and it's not baked, or a cake.
So if you're looking for a really, really, REALLY easy and light dessert to serve up after a big meal during the Easter break then these are for you. They can be eaten with a small spoon or devoured like a creme egg, whatever floats your boat. I bought the chocolate eggs from the supermarket, but if you're feeling really adventurous you could try making your own. Any plain, regular-sized hollow chocolate eggs will do. I got some very pretty ones that had all different flavours, I especially liked the look of the white chocolate and strawberry shell below. I hope everyone has a wonderful Easter holidays, I am looking forward to some time off!
Cheesecake-Filled Chocolate Easter Egg Cups
(makes 6-8 regular sized easter egg cheesecakes, you may need to adjust the amount of cheesecake filling depending on the size of your eggs)
6-8 hollow chocolate easter egg shells (mine were from the supermarket, approx 6cm tall and 4cm at its widest width,
150g (about 5oz) cream cheese, softened
30g (about 1/4 cup) icing sugar (confectioners' sugar), sifted
1/2 tsp lemon juice
1/2 tsp pure vanilla extract
125ml (about 1/2 cup) thickened/heavy whipping cream
For the 'yolk': 1 passionfruit, 1 tbsp apricot jam, 1 tbsp (about 15g) unsalted butter (passionfruit juice can be replaced with about 2 tsp of freshly squeezed orange, mandarin juice or mango, peach nectar, you can adjust the amount of juice to taste), alternatively you can substitute with any fruit curd you prefer.
Optional: you can include some cheesecake crust crumbs at the base of each egg if you really want to include some sort of crust into the dessert.
Using a small serrated knife, carefully remove the tops of the chocolate eggs. (A couple of people have mentioned that heating the knife under warm water will make this easier and neater, thanks for the tip! But personally I like having the jagged edges.) Place the eggs in the fridge to keep them chilled while you prepare the cheesecake filling, you can use egg cups or your fridge egg holder (Don't use an egg carton like me. I shouldn't have used it but I was desperate at the time, I bought the egg cups the day after!). Place the cream cheese, icing sugar, lemon juice and vanilla in a large mixing bowl and beat on high until the mixture is smooth and fluffy, about 3-4 minutes. Set aside and carefully whip the thickened cream in a separate mixing bowl to stiff peaks (watch it closely as thickened cream is very easy to overwhip and split). Using a whisk, gently combine the whipped cream into the cream cheese mixture until it is smooth. Carefully spoon or pipe the mixture into the prepared chocolate shells. Chill eggs for at least 30 minutes to allow it to set.
Prepare the passionfruit sauce; strain passionfruit pulp to remove the seeds and place in a small saucepan with the apricot jam and butter. Gently heat on low, whisking until the butter melts and the mixture is smooth. Remove from the heat and allow to cool. (If your apricot jam is chunky you should strain the sauce at this point) Place in the fridge and chill until it thickens slightly. Using a small spoon, carefully scoop out a hole in the centre of each cheesecake, about 1 cm deep and wide. Fill hole with some of the chilled passionfruit sauce and return the eggs to the fridge to chill again for at least 30 mins. Remove eggs from the fridge about 10 minutes before serving. Can be made 2-3 days in advance, keep eggs in the fridge in a holder inside an airtight container or covered tightly with clingfilm to stop them drying out.
Friday, February 14, 2014
Skinny Tortelloni and Peppers

It’s time to try tortelloni! Tortelloni is pretty much the exact same as tortellini, but larger and shaped more like a “belly button.” They are usually stuffed with similar fillings as ravioli, like spinach, cheese, or meat. In this recipe, the cheese-stuffed tortelloni is the centerpiece in a gorgeous color combination of red, orange and yellow bell peppers with a pop of green from the spinach. This one is healthy and beautiful! Doesn’t get much better than that! For more of my best vegetarian dishes, click here!


Prep time: 20 minutes
Cook time: 15 minutes
Yield: 4 servings
Serving size: 1 cup
Ingredients
- 9 oz whole wheat cheese tortelloni
- 1 Tbsp extra-virgin olive oil
- 1 small onion, thinly sliced
- 1 Tbsp garlic, minced
- 1 tsp dried oregano
- 1 red bell pepper, diced
- 1 yellow bell pepper, diced
- 1 orange bell pepper, diced
- 2 cups fresh spinach
- 1/4 cup fresh parsley, chopped
- 1/4 cup Parmesan-Reggiano cheese, grated
- 1/4 tsp salt
- 1/4 tsp black pepper
Instructions
- Bring a large pot of water to a boil. Add the tortelloni and cook according to package directions.
- While the pasta is cooking, heat oil in a large nonstick skillet over medium-high heat. Add the onion, garlic and oregano and cook, stirring occasionally, for 1 to 2 minutes or until onion is soft and transparent. Stir in the bell peppers and cook, stirring occasionally, for 7 minutes or until the onions are slightly golden brown. Pile on the spinach and allow it to wilt for about 2 or 3 additional minutes.
- Remove from heat and stir in tortelloni, parsley, cheese, salt and black pepper. Serve immediately.
Nutrition Information
Per Serving (1 cup):
Calories: 365
Fat: 10g
Carbohydrates: 54g
Fiber: 10g
Protein: 19g
Sugars: 3g
Sodium: 361mg
Vitamin A: 4%
Vitamin C: 70%
Calcium: 22%
Iron: 15%
WWP+: 9 pointsSpinach Lasagna Roll-Ups
Spinach Lasagna Roll-Ups - Lasagna Noodles rolled with a ricotta, parmesan and mozzarella cheese and spinach filling, topped with spaghetti sauce and sprinkled with some more mozzarella.
I'm having Internet issues.
Big time.
And it's so completely frustrating, as I'm sure you can well imagine or have probably experienced it yourself in the past.
It's taking F-O-R-E-V-E-R to load and sort of reminds me of the days of dial-up.
Many of you are probably too young to even know what that is.
That darn annoying dial tone when we'd want to get on the Internet.
Those were the days, hunh?
Yikes!
So, I'm hoping that it will be kind enough to allow me to post this tonight, or at least not post, then SAVE it, so I can post in the morning before I'm off to work.
Fingers crossed. Here's to hoping!
I made these roll-ups today.
They didn't exactly go as planned as you can see from my pictures, so go off the amended recipe, not from what you see in the pictures.
Too many noodles + not enough filling = a really good dinner that the Mr. and son loved, but it just needed more in the middle.
The noodles.
The spinach filling. Put 3-4 tablespoons on each noodle.
Ready to be rolled.
See, not enough filling on each noodle. Use the 10 noodles and you'll have enough filling and cheese.
Besides, if I'd used the 4 cups of Ricotta as I was originally planning, they would have been tough to roll because they would have been TOO thick and I would have had to use TWO 9 X 13-inch baking dishes instead of the one because as it was, they all just barely fit.
Follow the recipe, not my lead. haha
I'm only human.
Lotsa noodle, needs more UMPH in the middle.
Ready to be baked on Day 8.
This is what happens when you are baking every single day and you're attempting to make up your own recipe (even though I know there are plenty of spinach lasagna roll-up recipes out there. I didn't want to reference one, so made some errors and of course, was not able to revise because the post has to go up today.
I do believe that what I'll write in the recipe will work just fine though.
If not, here's my disclaimer...If you make it and it doesn't turn out or feed 4 people as I think it should, I take no responsibility. hee hee
Oh, and when you serve this, make sure you have a salad and some bread to eat with it, and make sure you tell your guests to save room for dessert (just to make sure there really is enough for 4 people should you have some very hungry eaters)!
Oh, and my video editor fell asleep this afternoon and when I went to wake her for dinner she wanted to sleep some more and she still isn't up, so we'll see about getting the video up tomorrow after we all get home from work.

Spinach Lasagna Roll-Ups - serves 4
Ingredients
10 lasagna noodles (are about 20 in the package - save for another dinner)
2 cups part-skim Ricotta cheese
1/2 cup grated Parmesan cheese
1 egg
1 tablespoon parsley
1 9 ounce package chopped spinach, thawed
2 cups Mozzarella cheese, 1/4 cup reserved for topping
1 26 ounce jar spaghetti sauce
Directions
Preheat oven to 375 degrees F. Prepare a 9 X 13-inch baking dish by spraying it with cooking spray.
Cook 10 lasagna noodles according to directions in salted boiling water.
Drain and place flat on wax paper sprayed with cooking spray until ready to roll.
In a medium bowl, beat egg and add Ricotta and Parmesan cheeses, and parsley. Mix until well combined.
Add spinach and thoroughly mix.
Pour half of the spaghetti sauce into the prepared baking dish and spread to evenly coat the bottom.
Place 3-4 tablespoons of filling on each noodle and spread evenly to coat.
Sprinkle the 1 1/2 cups of Mozzarella cheese over the noodles, dividing it evenly among them.
Beginning at a short end, roll the noodle up and place into prepared baking dish.
Cover with tin foil and bake for 30 minutes.
Remove from oven and uncover. Sprinkle remaining Mozzarella cheese and bake uncovered for 5 minutes more, or until cheese has melted.
I rate everything I bake on a scale of 1-4 with 4 being the best and these Spinach Lasagna Roll-Ups earned 3 1/2 rolling pins.
The men in my life thought they were truly delicious, and I even screwed them up.
I had boiled the WHOLE package of lasagna noodles and therefore there wasn't enough filling, so as you saw from the picture above, it looked like there was much more noodle than there was filling.
True that.
So, I amended the recipe to reflect what I thought should be fixed.
I do believe I already told you this though.
I'm tired and now I'm starting to lose it. haha
Also, when I baked them, I didn't cover them with tin foil.
Do that.
My noodles got a little hard and the cheese in the middles hadn't completely melted as I thought it should.
I just stuck the pan with the Mozz. on top and baked it for 30 minutes.
Follow the recipe.
Don't do as I did. I'll save you the trouble.
It's not that they weren't edible or really good. They just needed some minor adjustments.
I give you BIG baking hugs and muffins!!
Big time.
And it's so completely frustrating, as I'm sure you can well imagine or have probably experienced it yourself in the past.
It's taking F-O-R-E-V-E-R to load and sort of reminds me of the days of dial-up.
Many of you are probably too young to even know what that is.
That darn annoying dial tone when we'd want to get on the Internet.
Those were the days, hunh?
Yikes!
So, I'm hoping that it will be kind enough to allow me to post this tonight, or at least not post, then SAVE it, so I can post in the morning before I'm off to work.
Fingers crossed. Here's to hoping!
I made these roll-ups today.
They didn't exactly go as planned as you can see from my pictures, so go off the amended recipe, not from what you see in the pictures.
Too many noodles + not enough filling = a really good dinner that the Mr. and son loved, but it just needed more in the middle.
The noodles.
The spinach filling. Put 3-4 tablespoons on each noodle.
Ready to be rolled.
See, not enough filling on each noodle. Use the 10 noodles and you'll have enough filling and cheese.
Besides, if I'd used the 4 cups of Ricotta as I was originally planning, they would have been tough to roll because they would have been TOO thick and I would have had to use TWO 9 X 13-inch baking dishes instead of the one because as it was, they all just barely fit.
Follow the recipe, not my lead. haha
I'm only human.
Lotsa noodle, needs more UMPH in the middle.
Ready to be baked on Day 8.
This is what happens when you are baking every single day and you're attempting to make up your own recipe (even though I know there are plenty of spinach lasagna roll-up recipes out there. I didn't want to reference one, so made some errors and of course, was not able to revise because the post has to go up today.
I do believe that what I'll write in the recipe will work just fine though.
If not, here's my disclaimer...If you make it and it doesn't turn out or feed 4 people as I think it should, I take no responsibility. hee hee
Oh, and when you serve this, make sure you have a salad and some bread to eat with it, and make sure you tell your guests to save room for dessert (just to make sure there really is enough for 4 people should you have some very hungry eaters)!
Oh, and my video editor fell asleep this afternoon and when I went to wake her for dinner she wanted to sleep some more and she still isn't up, so we'll see about getting the video up tomorrow after we all get home from work.

Spinach Lasagna Roll-Ups - serves 4
Ingredients
10 lasagna noodles (are about 20 in the package - save for another dinner)
2 cups part-skim Ricotta cheese
1/2 cup grated Parmesan cheese
1 egg
1 tablespoon parsley
1 9 ounce package chopped spinach, thawed
2 cups Mozzarella cheese, 1/4 cup reserved for topping
1 26 ounce jar spaghetti sauce
Directions
Preheat oven to 375 degrees F. Prepare a 9 X 13-inch baking dish by spraying it with cooking spray.
Cook 10 lasagna noodles according to directions in salted boiling water.
Drain and place flat on wax paper sprayed with cooking spray until ready to roll.
In a medium bowl, beat egg and add Ricotta and Parmesan cheeses, and parsley. Mix until well combined.
Add spinach and thoroughly mix.
Pour half of the spaghetti sauce into the prepared baking dish and spread to evenly coat the bottom.
Place 3-4 tablespoons of filling on each noodle and spread evenly to coat.
Sprinkle the 1 1/2 cups of Mozzarella cheese over the noodles, dividing it evenly among them.
Beginning at a short end, roll the noodle up and place into prepared baking dish.
Cover with tin foil and bake for 30 minutes.
Remove from oven and uncover. Sprinkle remaining Mozzarella cheese and bake uncovered for 5 minutes more, or until cheese has melted.
I rate everything I bake on a scale of 1-4 with 4 being the best and these Spinach Lasagna Roll-Ups earned 3 1/2 rolling pins.
The men in my life thought they were truly delicious, and I even screwed them up.
I had boiled the WHOLE package of lasagna noodles and therefore there wasn't enough filling, so as you saw from the picture above, it looked like there was much more noodle than there was filling.
True that.
So, I amended the recipe to reflect what I thought should be fixed.
I do believe I already told you this though.
I'm tired and now I'm starting to lose it. haha
Also, when I baked them, I didn't cover them with tin foil.
Do that.
My noodles got a little hard and the cheese in the middles hadn't completely melted as I thought it should.
I just stuck the pan with the Mozz. on top and baked it for 30 minutes.
Follow the recipe.
Don't do as I did. I'll save you the trouble.
It's not that they weren't edible or really good. They just needed some minor adjustments.
I give you BIG baking hugs and muffins!!
Saturday, February 1, 2014
Recipes For A Skinny Valentine
What can be more romantic on Valentine's Day than sharing a special home cooked meal with your sweetie.
For those of you not making reservations for Valentine's Day I thought I would compile some elegant yet simple skinny dishes your sweetie will enjoy, and you won't be spending hours in the kitchen. Hope you enjoy!!
Crock Pot Bolognese
Because you don't want to spend your Valentine's Day cooking, let the crock pot work for you! Vegans can use veggie crumbles instead of beef.
Chicken Rollatini with Spinach alla Parmigiana
If it's chicken your significant other craves, you can't go wrong with this simple yet elegant dish.
This fabulous Herb Crusted Rib Eye Roast is coated with sour cream, horseradish, herbs de provence and breadcrumbs, perfect for the beef lover in your house!
For a quick seafood option, try the Angel Hair Pasta with Shrimp and Tomato Sauce. The shrimp is cooked with tomatoes, a touch of cream, white wine and a hint of lemon. The whole dish takes under 20 minutes to make and it's delicious.
And what's a Valentine's Day without a sweet ending. Here are some great options...
Skinny Chocolate Cake
Dark Chocolate Chunk Bread Pudding
Skinny Strawberries Romanoff
Chocolate Covered Strawberries
Subscribe to:
Posts (Atom)
