Friday, February 21, 2014

snickers bar cheesecake pie

I found it a little bit by accident.  See, I was having some friends over for dinner and realized at the very last second that I needed a fabulous dessert.  I remembered that I had just gotten Lori’s book so I thumbed through to the dessert section.  There (among some other pretty fabulous options) was this sweet concoction.
Snickers Bar Cheesecake Pie

As you can imagine, I was instantly drawn to the decadent flavors.  Snickers is my second favorite candy bar of all time, so you can imagine how excited I got when I saw it was paired with Oreo crust and cheesecake.
Snickers Bar Cheesecake Pie

Then topped with whipped cream, caramel sauce, hot fudge and MORE snickers?  I was in HEAVEN.
Truth be told, I made two of these in 48 hours.  And I don’t regret it for one single second.
Snickers Bar Cheesecake Pie

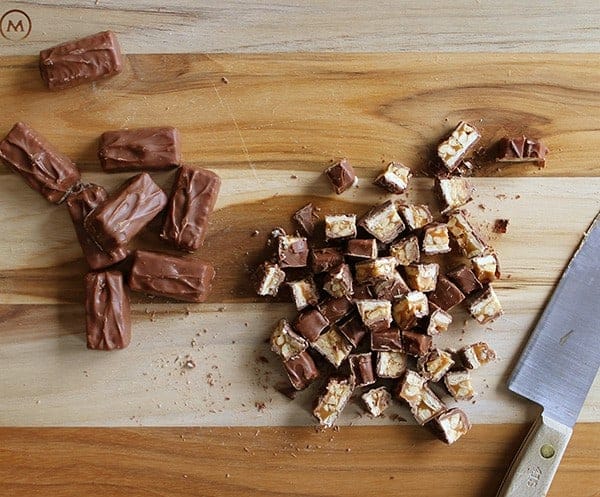
The whole fabulous experience begins when you get to cut up 16 snack size snickers bars.  It just so happens that there were 19 bars in the bag, which was the perfect amount for the filling of the cheesecake and then to garnish the top.
This was NOT the perfect amount if you have zero self control and just HAD to snack on one or seven of those sweet little bites as you were slaving away over the cutting board.
Just buy two bags.
Snickers Bar Cheesecake Pie

snickers bar cheesecake pie
Ingredients
  • 2 8-ounce packages of cream cheese, at room temperature
  • 1/2 cup granulated white sugar
  • 2 large eggs
  • 16 "fun size" snickers candy bars, chopped (2 cups total)
  • 2 6-ounce Oreo Pie Crust
  • 2 tbsp melted butter
Instructions
  1. Place cream cheese into bowl of stand mixer. Mix on medium-low speed for 30 seconds. Add in sugar and eggs and beat until smooth.
  2. Remove bowl from stand and stir in chopped candy bars.
  3. In a small bowl combine the Oreo pie crusts and the butter gently with a fork.
  4. Prepare a 6-inch spring-form pan and then press the Oreo mixture into the pan and up the sides.
  5. Pour the filling into the pan and bake until set, 35-40 minutes at 325 degrees.
  6. Set the pie on a wire rack and let it cool completely.

Thursday, February 20, 2014

Top 10 Quick Dinners


Wondering what to make for dinner tonight? Try our favorite top 10 quick dinners from Simple & Delicious magazine—each can be made in 30 minutes or less!

Hearty Penne Beef
Hearty Penne Beef
This is one of our favorite recipes. I made it for my neighbor and she can't stop making it either. It is very easy to make and everyone loves it.

  • Herbed Artichoke Cheese Tortellini Photo
    Herbed Artichoke Cheese Tortellini
  • Potato Kielbasa Skillet Photo
    Potato Kielbasa Skillet
  • Honey Grilled Shrimp Photo
    Honey Grilled Shrimp
  • Tasty Burritos Photo
    Tasty Burritos
  • Herb Chicken with Honey Butter Photo
    Herb Chicken with Honey Butter
  • Pasta Carbonara Photo
    Pasta Carbonara
  • Salmon with Vegetable Salsa Photo
    Salmon with Vegetable Salsa
  • Barbecue Pork and Penne Skillet Photo
    Barbecue Pork and Penne Skillet
  • Wild Rice Chicken Dinner Photo
    Wild Rice Chicken Dinner

Top 10 Cherry Desserts


Bright and cheery, these top-rated cherry desserts are perfect for holidays—or any day! From a favorite cherry pie recipe to easy cherry crisp and fun chocolate-covered cherries, treat family and friends to these sweet recipes.

Cherry Dream Cake Recipe
Cherry Dream Cake
This recipe is a bona fide hit. I make it every holiday and there are barely any leftovers the next day. My family loves this. Thanks for sharing!

  • Cherry Bars Photo
    Cherry Bars
  • Chocolate-Covered Cherry Cookies Photo
    Chocolate-Covered Cherry Cookies
  • Cheery Cherry Cookies Photo
    Cheery Cherry Cookies
  • Chocolate Covered Cherries Photo
    Chocolate Covered Cherries
  • Quick Cherry Turnovers Photo
    Quick Cherry Turnovers
  • Cherry Chocolate Coconut Cupcakes Photo
    Cherry Chocolate Coconut Cupcakes
  • Easy Cherry Strudels Photo
    Easy Cherry Strudels
  • White Chocolate Mousse Cherry Pie Photo
    White Chocolate Mousse Cherry Pie
  • Microwave Cherry Crisp Photo
    Microwave Cherry Crisp

My Favorite Peanut Butter Cookies


peanut butter cookies-8409
I got to thinking the other day about how I didn’t have a good old fashioned classic peanut butter cookie recipe on this site. The horror! While there’s tons of cookie recipes in my recipe index, most of them are all gussied up with chocolate, nuts or other fancy things. Sometimes you just need a classic cookie and a cup of milk…amen?
These peanut butter cookies are no frills delicious. They are like the kind you get from a bakery — all big and soft and full of peanut butter flavor. I must have made these cookies at least a hundred times in college. They are perfect fuel for late night study sessions, parties, gifts for the boyfriend, girls nights and, let’s be honest, broken hearts. In my experience, a good home baked cookie and a bubble bath often functions as life’s perfect medicine.
So if you like big soft peanut butter cookies, these are for you!
peanut butter cookies-8371
I think they key to great peanut butter cookies is using only brown sugar in the dough. It makes them super chewy and soft. And don’t even get me started on what it’s like to make ice cream sandwiches with these babies warm out of the oven using vanilla bean gelato and a {huge} drizzle of chocolate sauce. Please.
peanut butter cookies-8379
Yum. I just don’t even know what else there is to say….but yum.
Happy {early} weekend!
peanut butter cookies-8407
My Favorite Peanut Butter Cookies
adapted from Gourmet

Yields 2 dozen large cookies
Ingredients:
1 stick unsalted butter, softened
1 cup dark brown sugar, packed
3/4 cup peanut butter
1 cup bread flour
1 tsp baking soda
1/2 tsp sea salt
1 egg
1 tsp vanilla
Directions:
Preheat oven to 350. Line two baking sheets with either silpats or parchment paper.
Cream together the butter, brown sugar and peanut butter until fluffy. Add the egg and vanilla and mix until just combined.
In another bowl, whisk together the flour, salt and baking soda. Add to the wet ingredients and blend just until a dough forms.
Using a large spoon or an ice cream scoop, scoop out big balls of dough onto your prepared baking sheet — about 3″ apart. Press down gently with a wet fork on each cookie.
Bake for 15 minutes until edges are golden.
Time:
25 minutes

Crock Pot Tex-Mex Chicken Lettuce Wraps


Hi.
I’m so filled with excitement and anticipation right now, guys! I hardly believe my book is coming out next Tuesday (!!) and, on top of that, we are working around the clock to finish up the ELR redesign! So much good stuff happening around here. I can hardly stand it. Thank you so much for your continued support through all these changes! It means a lot to me.
If you haven’t noticed, I’ve been using my crock pot a lot lately. I think I’ve definitely gotten my $24 of use out of it! {In case you’re wondering, here’s the model that I have, although I purchased mine from Target last year!} I just love it, especially the ease of only having to spend about ten minutes active time preparing a yummy meal to eat later. This time, I wanted to develop a chicken variation of my beef carnitas tacos.
This chicken variation is a bit lighter and healthier than the beef tacos {but still delicious!}. And to lighten things up even more, the spicy chicken mixture is all wrapped up nice and neat in a big ol’ lettuce leaf.
For these, I used boneless skinless chicken breasts. You don’t have to worry about them drying out in the slow cooker, though, because you’re going to cover them with onion, jalapeno and a jar of your favorite salsa! All those juices release during a nice slow cook, giving you perfectly juicy and spicy chopped chicken by the end.
Yum.
You can use the taco seasoning of your choice here! I am very partial to this easy, homemade one by Rachel, though! I made a huge batch of it last week and have been sprinkling it on just about everything since. I bet you have everything you need in your pantry right now to make it….go check!
If not, any ol’ taco seasoning will do just fine.
We loved these spicy lettuce wraps as a light(er) dinner last week. Adam also threw some leftover tex-mex chicken into scrambled eggs for breakfast! The amount of spice in the chicken really depends on the heat in the salsa you choose. If you’re not sure about spice, just omit the jalapeno and use mild salsa.
Then….all that’s left to do is……
wrap it up! wrap wrap wrap it up!
and enjoy.
Crock Pot Tex-Mex Chicken Lettuce Wraps
 serves 4-6

Ingredients:
1 1/2 lbs boneless, skinless chicken breast
1 1/2 tbsp taco seasoning
1 jalapeno, seeded and sliced
1 16 oz jar of salsa
1 yellow onion, diced
salt, as needed (I used 1 tsp)
iceberg lettuce leaves for wrapping
Directions:
Sprinkle seasoning all over chicken breasts, then place breasts at the bottom of the slow cooker.
Scatter onion and jalapeno over chicken breasts. Pour salsa over top. Place lid on slow cooker and cook on LOW for 4-5 hours.
After 4-5 hours, remove chicken breasts from slow cooker and chop up. Place chopped chicken back in slow cooker and stir to combine. Season with salt to taste.
To serve lettuce wraps, spread one lettuce leaf out and scoop about 1/4th cup chicken mixture on top. Roll up lettuce leaf and enjoy!

Monday, February 17, 2014

PUMPKIN SAGE SCONES WITH SPICY CHERRY JAM


Pumpkin Sage Scones with Spicy Cherry Jam- Baker Bettie

That time of year is here again. That obnoxious time, that I secretly love, where anything and everything is pumpkin spice flavored. And I hear both sides of the coin all the time. There are the people that are totally into it. All out pumpkin eeeeeverything. And they tweet and instagram and facebook it all. “First pumpkin spice latte of the season ya’ll!” You know the kind. Maybe you are the kind. I’m not judging. But then there are those that mock that side. They’re all, “Why is everything pumpkin flavored? Pumpkin sucks!” And you guys are right. Pumpkin completely on it’s own isn’t really all that exciting flavor wise. But pumpkin hating peeps, here is the deal: It really isn’t about the actual pumpkin flavor. It’s about the spice! The cinnamon, the nutmeg, the allspice, the ginger. All of those things that go into pumpkin pie spice is what we associate with the flavor of pumpkin. And I secretly love it because those spices scream that Fall is coming and things are about to get a whole lot more cozy.
Pumpkin Sage Scones with Spicy Cherry Jam- Baker Bettie

After writing all that, I feel like I just became an advocate for pumpkin season. That really wasn’t my intention. But since we’re going that way, pumpkin is actually pretty awesome especially as a substitution in baking. Similar to mashed banana, pumpkin can often be used as a substitution for eggs or oil in baked goods. For instance, a scone recipe typically calls for one egg. But since I am making pumpkin scones, I don’t even need a replacement for the egg. The pumpkin will do the trick in binding the scones together. And pumpkin works similarly in this pumpkin pecan bread, thesepumpkin cinnamon rolls, and pumpkin chocolate coffee cake.
Pumpkin Sage Scones with Spicy Cherry Jam- Baker Bettie

Probably the most important thing to keep in mind when adapting or writing recipes for alternative baking methods is what the purpose of each ingredient is that you are substituting. In a traditional scone recipe there are typically three components that need to be adapted for a vegan version.
The Egg: Because of the amount of other leaveners in a scone recipe (baking powder and baking soda), the egg is mostly used for binding the scone together and for a bit of moisture. The pumpkin in this recipe replaces both. Other options could be banana, non-dairy yogurt, chia egg, or flax egg.
The Fat: Often cold butter is the fat in a scone recipe, though shortening is seen at times. The fat gives richness to the scone but also serves as an important part of the rising process. The fat needs to be cold so that when it heats up in the oven the water will start to evaporate and the steam helps the scone to rise. This cold solid fat is easily replaced with vegan butter, or vegetable shortening. I prefer the flavor, or lack there of, and texture that vegetable shortening brings to the party.
The Milk or Buttermilk: Plain milk or cream in a recipe mostly serves the purpose of moisture and richness and can be easily replaced with non-dairy milk. Buttermilk, on the other hand, is acidic and brings some tang into the batter and usually serves an additional purpose of activating the baking soda. (Because as we know, if you’ve read my science of baking soda and baking powder article, baking soda needs something acidic to balance it’s alkalinity in order to serve the purpose of leavening the batter.) So non-dairy milk on it’s own will not be a good substitute. We need to add some acidity, and vinegar (or lemon juice) will do the trick.
Pumpkin Sage Scones with Spicy Cherry Jam- Baker Bettie
And now, I leave you to gawk at the scones. The lovely orange colored, and beautifully earthy flavored, scones. Not to toot my own horn, but the idea of the spicy cherry jam to pair with these was a pretty damn good idea. In fact the jam all on it’s own is a pretty amazing idea. Toot, toot.
Welcome to Fall. Welcome to pumpkin spice season. Here we go!
Pumpkin Sage Scones with Spicy Cherry Jam- Baker Bettie

Pumpkin Sage Scones (vegan)
Yield: 12-14 scones
Pumpkin Sage Scones (vegan)
Ingredients
  • 3/4 cup non-dairy milk
  • 1 TBSP vinegar
  • 4 1/4 cups flour
  • 1/2 cup sugar
  • 1 TBSP baking powder
  • 3/4 tsp baking soda
  • 1 tsp kosher salt
  • 1 1/2 tsp pumpkin pie spice
  • 1/4 cup packed fresh sage leaves, chiffonade (thin strips)
  • 10 TBSP cold vegetable shortening (or vegan butter), cut into small pieces
  • 1 cup pumpkin puree (not pumpkin pie filling)
Instructions
  1. Combine the non-dairy milk and the vinegar together and set aside.
  2. In a large bowl, whisk together the flour, sugar, baking powder, baking soda, salt, pumpkin pie spice, and sage.
  3. Add the shortening and use a pastry blender or a fork to cut it into the dry ingredients until it is the consistency of peas.
  4. Make a well in the center of the flour mixture and add in the pumpkin puree and non-dairy milk/vinegar mixture.
  5. Stir together just until combined. Knead the dough over itself in the bowl about 4 times.
  6. Refrigerate for about 1 hour.
  7. Preheat oven to 400ºF.
  8. Flour a clean work surface and pat out the dough to 3/4" thick. You can cut out with a circular cutter, or cut into squares or triangles.
  9. Place in a greased cake pan or cookie sheet and bake for 16-18 minutes. Do not open the door to check on them for at least the first 8 minutes or you will release the steam and they will not rise as high.
  10. Serve with spicy cherry jam.
Spicy Cherry Quick Jam
Ingredients
  • 1 lb frozen tart cherries
  • 1 cup sugar
  • 1/4 tsp cayenne pepper
  • 1/2 tsp pumpkin pie spice (optional)
  • pinch salt
Instructions
  1. Combine all ingredients in a saucepan over medium heat.
  2. Stir occasionally while the sugar is melting and the cherries are thawing.
  3. Once the cherries become soft begin to mash them down with a spoon or a potato masher.
  4. Bring to a boil and cook until the mixture begins to thicken.
  5. Remove from the heat and let cool.
  6. Store in an airtight container in the refrigerator for up to a week.