Showing posts with label health food coupons. Show all posts

Friday, February 21, 2014

snickers bar cheesecake pie

I found it a little bit by accident.  See, I was having some friends over for dinner and realized at the very last second that I needed a fabulous dessert.  I remembered that I had just gotten Lori’s book so I thumbed through to the dessert section.  There (among some other pretty fabulous options) was this sweet concoction.
Snickers Bar Cheesecake Pie

As you can imagine, I was instantly drawn to the decadent flavors.  Snickers is my second favorite candy bar of all time, so you can imagine how excited I got when I saw it was paired with Oreo crust and cheesecake.
Snickers Bar Cheesecake Pie

Then topped with whipped cream, caramel sauce, hot fudge and MORE snickers?  I was in HEAVEN.
Truth be told, I made two of these in 48 hours.  And I don’t regret it for one single second.
Snickers Bar Cheesecake Pie

The whole fabulous experience begins when you get to cut up 16 snack size snickers bars.  It just so happens that there were 19 bars in the bag, which was the perfect amount for the filling of the cheesecake and then to garnish the top.
This was NOT the perfect amount if you have zero self control and just HAD to snack on one or seven of those sweet little bites as you were slaving away over the cutting board.
Just buy two bags.
Snickers Bar Cheesecake Pie

snickers bar cheesecake pie
Ingredients
  • 2 8-ounce packages of cream cheese, at room temperature
  • 1/2 cup granulated white sugar
  • 2 large eggs
  • 16 "fun size" snickers candy bars, chopped (2 cups total)
  • 2 6-ounce Oreo Pie Crust
  • 2 tbsp melted butter
Instructions
  1. Place cream cheese into bowl of stand mixer. Mix on medium-low speed for 30 seconds. Add in sugar and eggs and beat until smooth.
  2. Remove bowl from stand and stir in chopped candy bars.
  3. In a small bowl combine the Oreo pie crusts and the butter gently with a fork.
  4. Prepare a 6-inch spring-form pan and then press the Oreo mixture into the pan and up the sides.
  5. Pour the filling into the pan and bake until set, 35-40 minutes at 325 degrees.
  6. Set the pie on a wire rack and let it cool completely.

Thursday, February 20, 2014

Top 10 Cherry Desserts


Bright and cheery, these top-rated cherry desserts are perfect for holidays—or any day! From a favorite cherry pie recipe to easy cherry crisp and fun chocolate-covered cherries, treat family and friends to these sweet recipes.

Cherry Dream Cake Recipe
Cherry Dream Cake
This recipe is a bona fide hit. I make it every holiday and there are barely any leftovers the next day. My family loves this. Thanks for sharing!

  • Cherry Bars Photo
    Cherry Bars
  • Chocolate-Covered Cherry Cookies Photo
    Chocolate-Covered Cherry Cookies
  • Cheery Cherry Cookies Photo
    Cheery Cherry Cookies
  • Chocolate Covered Cherries Photo
    Chocolate Covered Cherries
  • Quick Cherry Turnovers Photo
    Quick Cherry Turnovers
  • Cherry Chocolate Coconut Cupcakes Photo
    Cherry Chocolate Coconut Cupcakes
  • Easy Cherry Strudels Photo
    Easy Cherry Strudels
  • White Chocolate Mousse Cherry Pie Photo
    White Chocolate Mousse Cherry Pie
  • Microwave Cherry Crisp Photo
    Microwave Cherry Crisp

Crock Pot Tex-Mex Chicken Lettuce Wraps


Hi.
I’m so filled with excitement and anticipation right now, guys! I hardly believe my book is coming out next Tuesday (!!) and, on top of that, we are working around the clock to finish up the ELR redesign! So much good stuff happening around here. I can hardly stand it. Thank you so much for your continued support through all these changes! It means a lot to me.
If you haven’t noticed, I’ve been using my crock pot a lot lately. I think I’ve definitely gotten my $24 of use out of it! {In case you’re wondering, here’s the model that I have, although I purchased mine from Target last year!} I just love it, especially the ease of only having to spend about ten minutes active time preparing a yummy meal to eat later. This time, I wanted to develop a chicken variation of my beef carnitas tacos.
This chicken variation is a bit lighter and healthier than the beef tacos {but still delicious!}. And to lighten things up even more, the spicy chicken mixture is all wrapped up nice and neat in a big ol’ lettuce leaf.
For these, I used boneless skinless chicken breasts. You don’t have to worry about them drying out in the slow cooker, though, because you’re going to cover them with onion, jalapeno and a jar of your favorite salsa! All those juices release during a nice slow cook, giving you perfectly juicy and spicy chopped chicken by the end.
Yum.
You can use the taco seasoning of your choice here! I am very partial to this easy, homemade one by Rachel, though! I made a huge batch of it last week and have been sprinkling it on just about everything since. I bet you have everything you need in your pantry right now to make it….go check!
If not, any ol’ taco seasoning will do just fine.
We loved these spicy lettuce wraps as a light(er) dinner last week. Adam also threw some leftover tex-mex chicken into scrambled eggs for breakfast! The amount of spice in the chicken really depends on the heat in the salsa you choose. If you’re not sure about spice, just omit the jalapeno and use mild salsa.
Then….all that’s left to do is……
wrap it up! wrap wrap wrap it up!
and enjoy.
Crock Pot Tex-Mex Chicken Lettuce Wraps
 serves 4-6

Ingredients:
1 1/2 lbs boneless, skinless chicken breast
1 1/2 tbsp taco seasoning
1 jalapeno, seeded and sliced
1 16 oz jar of salsa
1 yellow onion, diced
salt, as needed (I used 1 tsp)
iceberg lettuce leaves for wrapping
Directions:
Sprinkle seasoning all over chicken breasts, then place breasts at the bottom of the slow cooker.
Scatter onion and jalapeno over chicken breasts. Pour salsa over top. Place lid on slow cooker and cook on LOW for 4-5 hours.
After 4-5 hours, remove chicken breasts from slow cooker and chop up. Place chopped chicken back in slow cooker and stir to combine. Season with salt to taste.
To serve lettuce wraps, spread one lettuce leaf out and scoop about 1/4th cup chicken mixture on top. Roll up lettuce leaf and enjoy!

Monday, February 17, 2014

PUMPKIN SAGE SCONES WITH SPICY CHERRY JAM


Pumpkin Sage Scones with Spicy Cherry Jam- Baker Bettie

That time of year is here again. That obnoxious time, that I secretly love, where anything and everything is pumpkin spice flavored. And I hear both sides of the coin all the time. There are the people that are totally into it. All out pumpkin eeeeeverything. And they tweet and instagram and facebook it all. “First pumpkin spice latte of the season ya’ll!” You know the kind. Maybe you are the kind. I’m not judging. But then there are those that mock that side. They’re all, “Why is everything pumpkin flavored? Pumpkin sucks!” And you guys are right. Pumpkin completely on it’s own isn’t really all that exciting flavor wise. But pumpkin hating peeps, here is the deal: It really isn’t about the actual pumpkin flavor. It’s about the spice! The cinnamon, the nutmeg, the allspice, the ginger. All of those things that go into pumpkin pie spice is what we associate with the flavor of pumpkin. And I secretly love it because those spices scream that Fall is coming and things are about to get a whole lot more cozy.
Pumpkin Sage Scones with Spicy Cherry Jam- Baker Bettie

After writing all that, I feel like I just became an advocate for pumpkin season. That really wasn’t my intention. But since we’re going that way, pumpkin is actually pretty awesome especially as a substitution in baking. Similar to mashed banana, pumpkin can often be used as a substitution for eggs or oil in baked goods. For instance, a scone recipe typically calls for one egg. But since I am making pumpkin scones, I don’t even need a replacement for the egg. The pumpkin will do the trick in binding the scones together. And pumpkin works similarly in this pumpkin pecan bread, thesepumpkin cinnamon rolls, and pumpkin chocolate coffee cake.
Pumpkin Sage Scones with Spicy Cherry Jam- Baker Bettie

Probably the most important thing to keep in mind when adapting or writing recipes for alternative baking methods is what the purpose of each ingredient is that you are substituting. In a traditional scone recipe there are typically three components that need to be adapted for a vegan version.
The Egg: Because of the amount of other leaveners in a scone recipe (baking powder and baking soda), the egg is mostly used for binding the scone together and for a bit of moisture. The pumpkin in this recipe replaces both. Other options could be banana, non-dairy yogurt, chia egg, or flax egg.
The Fat: Often cold butter is the fat in a scone recipe, though shortening is seen at times. The fat gives richness to the scone but also serves as an important part of the rising process. The fat needs to be cold so that when it heats up in the oven the water will start to evaporate and the steam helps the scone to rise. This cold solid fat is easily replaced with vegan butter, or vegetable shortening. I prefer the flavor, or lack there of, and texture that vegetable shortening brings to the party.
The Milk or Buttermilk: Plain milk or cream in a recipe mostly serves the purpose of moisture and richness and can be easily replaced with non-dairy milk. Buttermilk, on the other hand, is acidic and brings some tang into the batter and usually serves an additional purpose of activating the baking soda. (Because as we know, if you’ve read my science of baking soda and baking powder article, baking soda needs something acidic to balance it’s alkalinity in order to serve the purpose of leavening the batter.) So non-dairy milk on it’s own will not be a good substitute. We need to add some acidity, and vinegar (or lemon juice) will do the trick.
Pumpkin Sage Scones with Spicy Cherry Jam- Baker Bettie
And now, I leave you to gawk at the scones. The lovely orange colored, and beautifully earthy flavored, scones. Not to toot my own horn, but the idea of the spicy cherry jam to pair with these was a pretty damn good idea. In fact the jam all on it’s own is a pretty amazing idea. Toot, toot.
Welcome to Fall. Welcome to pumpkin spice season. Here we go!
Pumpkin Sage Scones with Spicy Cherry Jam- Baker Bettie

Pumpkin Sage Scones (vegan)
Yield: 12-14 scones
Pumpkin Sage Scones (vegan)
Ingredients
  • 3/4 cup non-dairy milk
  • 1 TBSP vinegar
  • 4 1/4 cups flour
  • 1/2 cup sugar
  • 1 TBSP baking powder
  • 3/4 tsp baking soda
  • 1 tsp kosher salt
  • 1 1/2 tsp pumpkin pie spice
  • 1/4 cup packed fresh sage leaves, chiffonade (thin strips)
  • 10 TBSP cold vegetable shortening (or vegan butter), cut into small pieces
  • 1 cup pumpkin puree (not pumpkin pie filling)
Instructions
  1. Combine the non-dairy milk and the vinegar together and set aside.
  2. In a large bowl, whisk together the flour, sugar, baking powder, baking soda, salt, pumpkin pie spice, and sage.
  3. Add the shortening and use a pastry blender or a fork to cut it into the dry ingredients until it is the consistency of peas.
  4. Make a well in the center of the flour mixture and add in the pumpkin puree and non-dairy milk/vinegar mixture.
  5. Stir together just until combined. Knead the dough over itself in the bowl about 4 times.
  6. Refrigerate for about 1 hour.
  7. Preheat oven to 400ºF.
  8. Flour a clean work surface and pat out the dough to 3/4" thick. You can cut out with a circular cutter, or cut into squares or triangles.
  9. Place in a greased cake pan or cookie sheet and bake for 16-18 minutes. Do not open the door to check on them for at least the first 8 minutes or you will release the steam and they will not rise as high.
  10. Serve with spicy cherry jam.
Spicy Cherry Quick Jam
Ingredients
  • 1 lb frozen tart cherries
  • 1 cup sugar
  • 1/4 tsp cayenne pepper
  • 1/2 tsp pumpkin pie spice (optional)
  • pinch salt
Instructions
  1. Combine all ingredients in a saucepan over medium heat.
  2. Stir occasionally while the sugar is melting and the cherries are thawing.
  3. Once the cherries become soft begin to mash them down with a spoon or a potato masher.
  4. Bring to a boil and cook until the mixture begins to thicken.
  5. Remove from the heat and let cool.
  6. Store in an airtight container in the refrigerator for up to a week.

Saturday, February 15, 2014

Cheesecake Filled Chocolate Easter Eggs


cheesecake_easteregg_cups
It's hard to believe Easter is just around the corner. This year is going too fast for me to keep up! I swear it felt like yesterday that I was laughing at how quickly the Easter displays went up to replace the Christmas stuff at the beginning of the year, it has managed to creep up on me. My days are getting busier and busier, so I am easily drawn to the simpler, quicker desserts that I can pull together at the last minute. This recipe could not be any easier; there's no baking involved and it takes hardly any time to create these cute
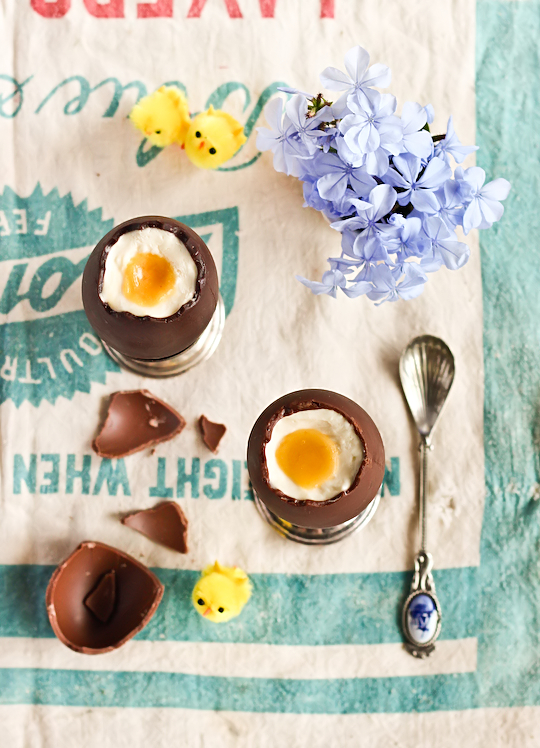
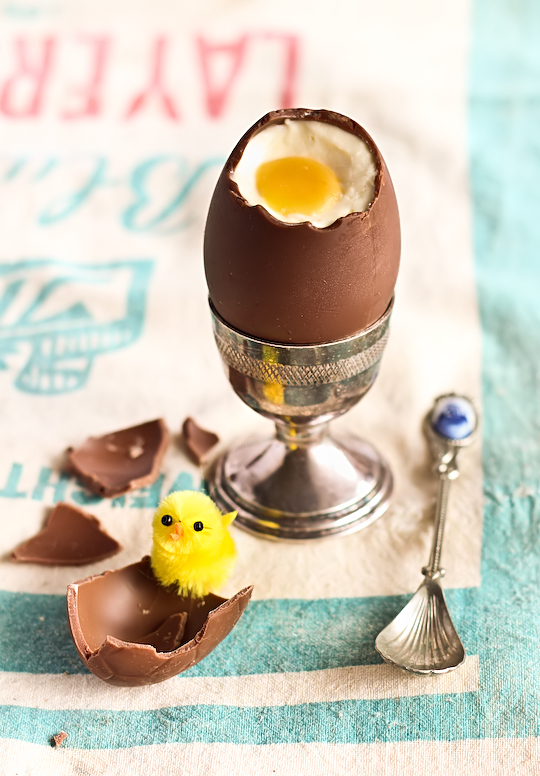
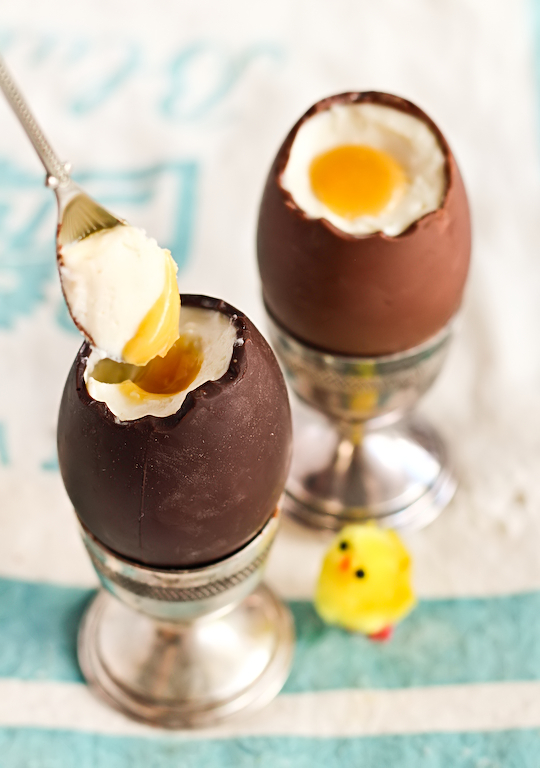
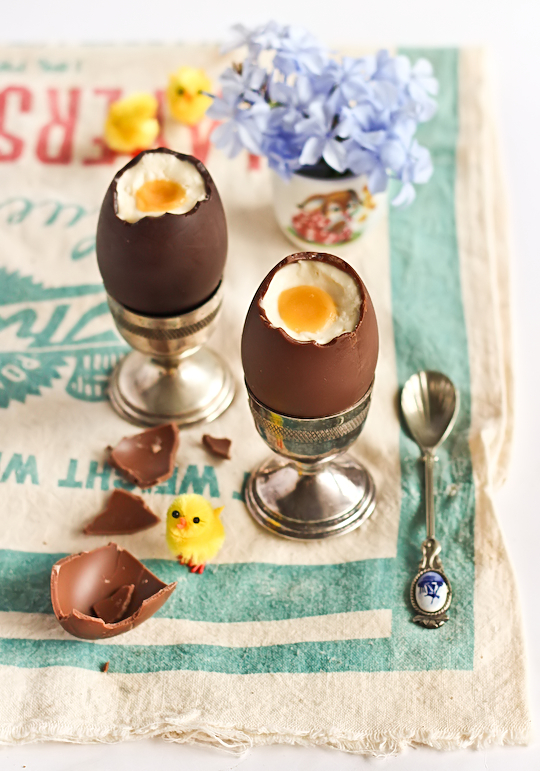
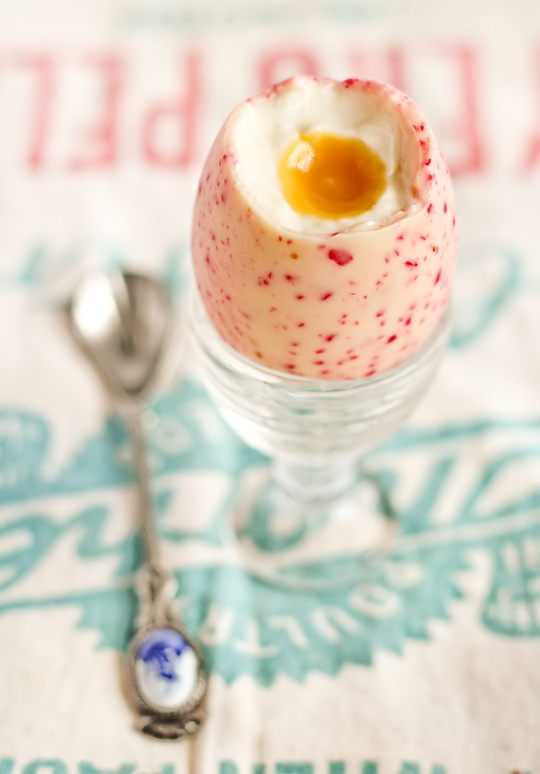
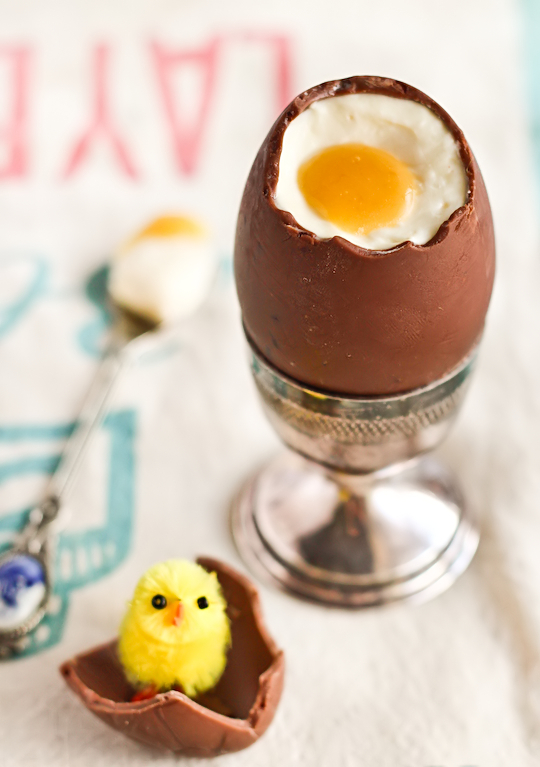
Cheesecake-Filled Chocolate Easter Eggs with a 'yolk' made of passionfruit sauce.
cheesecake_easteregg_cups-7
I took it as a compliment when Lisa (who hates eating eggs) said that these looked so much like real eggs that she was a little creeped out by them. The texture of the chilled cheesecake and the passionfruit sauce looks just right, making it a great filling for some regular hollow chocolate easter egg shells that I cut the tops off. I was inspired by the chocolate-mousse filled Easter egg cups that I've seen on sale and decided to do my own spin on that idea but with a cheesecake filling and a deliciously fruity filling in the centre that would look like an egg yolk. So it looks a little like a creme egg. It's not the same but it's just as tasty.
Cheesecake Filled Chocolate Easter Eggs
I used my regular chilled cheesecake filling recipe for this, and made up a sauce using passionfruit pulp, apricot jam and a little bit of butter. There's enough sourness from the passionfruit (and the lemon in the cheesecake) to make this a light, creamy and not overly sweet dessert. And it does not get easier than this. It's quite interesting to see how simple this recipe is compared to the Easter Bunny Macarons (including all the hilarious scenarios that I got carried away with while photographing them) and Hot Cross Bun Ice Cream Sandwiches that I came up with last year. This recipe is much quicker and less complicated, but hopefully just as enjoyable to eat!
cheesecake_easteregg_cups-2
Alright, I admit I may have taken a few too many photos of these little treats. Probably more than was necessary. But I am still a little scarred from all the trouble I had with the ugliness that way my Twix Cake so I was just happy to have something cute and not falling apart to photograph. Surprisingly A was all excited when he saw these in the fridge and quickly ate two of them, I can never guess which of my recipes he'll end up liking but he was a big fan of the fluffy cheesecake filling and the small hit of passionfruit in the centre. Technically it's more of a cheesecake mousse since there's no crust (though you could put some crust at the bottom of each egg if you wanted) and it's not baked, or a cake.
cheesecake_easteregg_cups-5
So if you're looking for a really, really, REALLY easy and light dessert to serve up after a big meal during the Easter break then these are for you. They can be eaten with a small spoon or devoured like a creme egg, whatever floats your boat. I bought the chocolate eggs from the supermarket, but if you're feeling really adventurous you could try making your own. Any plain, regular-sized hollow chocolate eggs will do. I got some very pretty ones that had all different flavours, I especially liked the look of the white chocolate and strawberry shell below. I hope everyone has a wonderful Easter holidays, I am looking forward to some time off!
cheesecake_easteregg_cups-4
Cheesecake-Filled Chocolate Easter Egg Cups
(makes 6-8 regular sized easter egg cheesecakes, you may need to adjust the amount of cheesecake filling depending on the size of your eggs)
6-8 hollow chocolate easter egg shells (mine were from the supermarket, approx 6cm tall and 4cm at its widest width, apparently they're not so easy to find in the US so if anyone can find a good online store let me know and I'll link it, apparently you can find them in the US at See's Candy and Costco, thanks Birgit! And HERE at Amazon.com, thanks Tuscadero! Or make your own hereAnother commenter rolled melted chocolate around the inside of a cleaned out egg shell and then peeled away the shell when it was set.)
150g (about 5oz) cream cheese, softened
30g (about 1/4 cup) icing sugar (confectioners' sugar), sifted
1/2 tsp lemon juice
1/2 tsp pure vanilla extract
125ml (about 1/2 cup) thickened/heavy whipping cream
For the 'yolk': 1 passionfruit, 1 tbsp apricot jam, 1 tbsp (about 15g) unsalted butter (passionfruit juice can be replaced with about 2 tsp of freshly squeezed orange, mandarin juice or mango, peach nectar, you can adjust the amount of juice to taste), alternatively you can substitute with any fruit curd you prefer.
Optional: you can include some cheesecake crust crumbs at the base of each egg if you really want to include some sort of crust into the dessert.

Using a small serrated knife, carefully remove the tops of the chocolate eggs. (A couple of people have mentioned that heating the knife under warm water will make this easier and neater, thanks for the tip! But personally I like having the jagged edges.) Place the eggs in the fridge to keep them chilled while you prepare the cheesecake filling, you can use egg cups or your fridge egg holder (Don't use an egg carton like me. I shouldn't have used it but I was desperate at the time, I bought the egg cups the day after!). Place the cream cheese, icing sugar, lemon juice and vanilla in a large mixing bowl and beat on high until the mixture is smooth and fluffy, about 3-4 minutes. Set aside and carefully whip the thickened cream in a separate mixing bowl to stiff peaks (watch it closely as thickened cream is very easy to overwhip and split). Using a whisk, gently combine the whipped cream into the cream cheese mixture until it is smooth. Carefully spoon or pipe the mixture into the prepared chocolate shells. Chill eggs for at least 30 minutes to allow it to set.
collage_template1
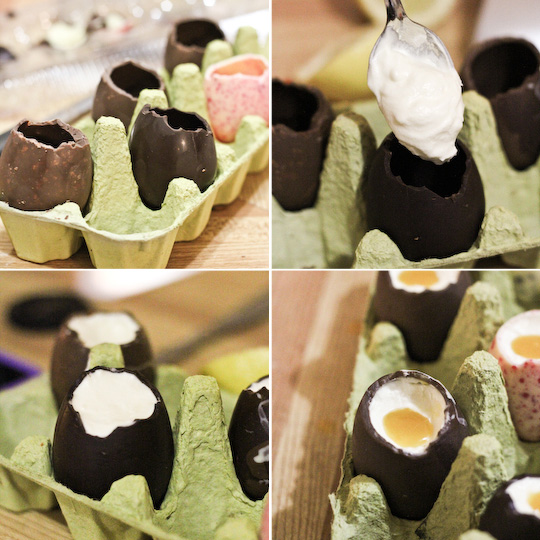
Prepare the passionfruit sauce; strain passionfruit pulp to remove the seeds and place in a small saucepan with the apricot jam and butter. Gently heat on low, whisking until the butter melts and the mixture is smooth. Remove from the heat and allow to cool. (If your apricot jam is chunky you should strain the sauce at this point) Place in the fridge and chill until it thickens slightly. Using a small spoon, carefully scoop out a hole in the centre of each cheesecake, about 1 cm deep and wide. Fill hole with some of the chilled passionfruit sauce and return the eggs to the fridge to chill again for at least 30 mins. Remove eggs from the fridge about 10 minutes before serving. Can be made 2-3 days in advance, keep eggs in the fridge in a holder inside an airtight container or covered tightly with clingfilm to stop them drying out.
cheesecake_easteregg_cups-6

Wednesday, February 12, 2014

Garlic And Goats Cheese Tart


This is one of my favourite recipes. It’s a wonderful vegetarian option that even the keenest meat eater will enjoy.
It’s based on a Ottelenghi recipe, I have found it best to use a deep tart dish of about an inch to an inch and a half, therefore you need a bit more filling, I have also found that if your in rush, absent the boiling of the garlic and just jump to the caramelisation.
Ottelenghi says that it feeds eight but I must have very hungry friends because I would be lucky to feed five of them with one tart! I have been known to eat a third of one so no judgement!

Garlic and Goats Cheese Tart
  • 375g All Butter Puff Pastry
  • 3 medium bulbs of Garlic, peeled
  • 1 tbsp Olive Oil
  • 1 tbsp Balsamic Vinegar
  • 220 ml Water
  • 3/4 tbsp Caster Sugar
  • 1 tsp chopped Thyme, plus a few sprigs to garnish
  • 1tsp chopped Rosemary
  • 400g of Soft Goats Cheese (the logs are perfect)
  • 3 Eggs
  • 150 ml Double Cream
  • 150ml Creme Fraiche
  • Salt and Pepper
  1. Preheat the oven to 180ºC.
  2. Roll out the Puff Pastry and line the tart tin (around 28cm) with it, cover with baking paper and fill with baking beans. Place in the fridge for 20mins to cool.
  3. Bake blind the tart case for 20mins of until the pastry is golden. Set aside.
  4. Place the Garlic cloves in a pan with water to cover them and simmer then for 3 mins, drain and pat dry.
  5. Return the saucepan to the hob and add the Olive Oil and Garlic, fry at a high heat for 2 mins while they colour, then add the Vinegar and Water and bring to the boil, simmer for 10 mins. Then add the Sugar,  Chopped Herbs, and some seasoning and reduce until a caramel like sauce covers the cloves.
  6. Make the custard by beating the Eggs, Cream and Creme Fraiche with seasoning by hand.
  7. Take your blind baked tart case and sprinkle the Goats Cheese across it in large lumps, you want it evenly distributed but for some parts to poke out of the custard so make them taller. Then sprinkle the Garlic in the same manner. Finally pour the custard over, making sure to fill it all over rather than just form the centre.
  8. Bake for at 160ºC for 35 to 45 mins or until the filling is set and golden.  Allow to cool slightly before serving.